Showing posts with label garden art. Show all posts

Monday, August 27, 2012

It's Bloomin' Tuesday!

 Welcome!
The Anemones aren't all blooming yet so I'm showing some garden art this week.


The Knock Out Roses are still going strong!
Want to join the tour?  Add a link to this post on your blog and add your name and permalink to Mr. Linky.
<
1. Kathy-Delightsome Life
2. Gabby
3. Rita aka Cashjocky
4. Donna's Designs
5. daisy
6. DarlaG
7. Lisa @ My Omaha Garden
8. Rosemary
9. Yael from Home Garden Diggers
10. Morning Glories and Sunshine
11. Bulb Season
12. Beyond The Garden Gate
13. Potato Bucket Yield

Powered by... Mister Linky's Magical Widgets.

Thursday, July 14, 2011

Wooden Bowl/Wheelbarrow

I found this vintage wooden bowl/wheelbarrow at a sale for $1.25. I bought it not really knowing what I would do with it. Once I came up with an idea, I drilled a couple holes in the bottom.

Then I dug around in my gardens for some succulents.

This is what I came up with.

I love it on the wicker table on my deck.


Thursday, July 07, 2011

Demo Treasure!

My daughter and I went to a couple sales last week. We went into the garage (One of my favorite places to shop!) and I spotted a shelf in the corner made with 3 old posts. It was marked 10 dollars and was 50% off! Of course, I had to have it! I was told that if I wanted it I had to remove it from the wall. A man had purchased a vice that was attached and wanted the shelf too but couldn't get it off.


My daughter backed away and said "You should never say that to my Mom!" The only tools left were a couple small hammers so I grabbed them both and started working. Another worker came and watched.


As you can tell, I got it loose! The second worker carried it to the car for me and when I thanked him he said it was worth it to watch me remove it! The other worker said she couldn't wait to see the man that tried to remove it earlier and tell him about it.


I was going to tear it apart but Laurie suggested I try it in the garden all together first. I dug around in the shed and basement to come up with some 'stuff' to put on it. I'm lovin' it! How about you?


Sorry about Bloomin' Tuesday this week! It was a busy weekend and I just didn't get to it. It will be back next week.

Friday, January 28, 2011

Anxious for Spring!

I've been wanting to check out a Home Goods store for awhile now but it was 30 minutes beyond where we usually shop. That makes it about 2 hours away. I had a Dr appointment on Tues. and decided to go. It was worth the drive just for this.
I just had to bring this adorable cherub home with me!

She's made of cement and covered with a very old rustic patina, just what I love!

She will be perfect in one of my shady garden areas.

Her sweet face has a nice calming effect.

She is about 19 inches tall and even her feet are adorable.

The best part is she was only 30 dollars!
Now I'm even more anxious for spring!

Wednesday, September 01, 2010

A New Little Boy...

...in the neighborhood! I found this adorable little boy with his dog at a household sale.

He is made from cement and very heavy.

I love all the details, don't you?

Such a cute puppy!


The best part is I got him on 50% off day! Only $22.50, what a bargain!
I'm planning to add more garden to the front yard and he will be perfect for a focal point.

Thursday, July 22, 2010

Flower 'Bed'

A friend gave me a branch from a curly willow tree that I planted in the back yard. I just added a couple touches to this area.You may recognize these items from this post.

You should have known I'd add them to my garden somewhere!


Friday, June 25, 2010

Hose Guards


PVC pipe pounded into the ground topped off with trailor hitches. Hitches found at a barn sale for 3 dollars each.

Friday, June 18, 2010

I need to quit...

...thinking!
The more I think, the more work I make for myself!
I thought it would be cute to have a chair by the table I showed you yesterday. I took one outside and realized the table wasn't tall enough for a normal chair. I tried this bench and it worked. I knew I couldn't keep it white but wasn't sure what color it should be.
After thinking for awhile I decided to paint it gray and then...
...cover it with cement.
It was just the touch the table needed. Now I need to quit thinking and enjoy!

Thursday, June 17, 2010

Inspiration!

Chris and Laurie had to have a tree cut down this year. When Laurie saw the trunk pieces, she thought of this. We saw this awesome table on a garden tour a few years ago. She e-mailed me a picture and asked if I'd like one. You know I said YES!
Chris used a hoist for a car engine to get the wood into his truck. He brought a piece of plywood and put it on top of the stump. We decided how to cut the plywood and I started covering it with cement. (Remember that 90 lb. bag of cement I bought!)
Laurie had the idea to put ferns in the table top. I had accidentally broke off some pieces of a large fern when I was trimming. I pushed them into the wet cement and left them for a while.
I LOVE it and think it's a perfect addition to my shade garden!

Friday, June 04, 2010

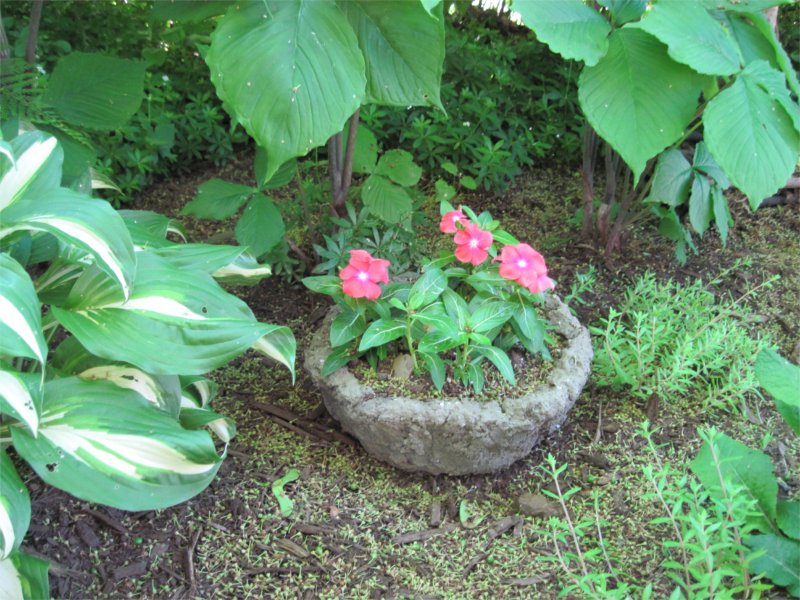
Hypertufa

I love the look of concrete bowls in the garden but hadn't been able to find any at household sales. I saw some articles about hypertufa and decided to give it a try. The recipe I used was
1 part Portland cement (no stones)
1 part perlite
1 part peat moss
1 part water (approximately)
The perlite and peat add texture and keep the items fairly light weight.I got a few different shaped plastic items and covered them with plastic wrap. (The recipe says you can also use Pam but I didn't try that.) If you want a smooth surface on the outside then use the inside of the bowl. I did learn that the item must be the height you want so the cement holds itself up. I should have cut the tops and handles off the green bowls.
The urn like item is plastic and I got it for 50 cents at a sale. I used it for a base and just covered it with cement. Remember to put holes in the bottom for drainage.
These bowls are great to add color to my shade garden and can be easily moved to different areas. The bowl for this one was the largest bowl from a cheap plastic set.
I planted a fuscia in the 'urn'.
Impatients in most of the others.
This was a fun, fairly inexpensive item to make that requires no special skills. I had to buy a 90 pound bag of concrete which is way more than I needed but it was still fairly cheap[.
I'd be interested if you've ever tried it to see what you made.
Let me know if you give it a try.